Wii Controller
Relive Wii memories with a homemade motion controller
Author: Gila Tiberiu-Florin
GitHub Project Link: https://github.com/UPB-PMRust-Students/proiect-tiberiugila
Description
The famous gaming controller is back, now implemented on a Raspberry Pi Pico 2
Motivation
I had a Wii when I was little and spent hours playing tennis on it. Recreating the Wii controller using a Raspberry Pi Pico 2 is a way to bring back that experience while learning more about sensors, motion tracking, wireless communication, and microcontroller programming. It’s a fun way to combine nostalgia with hands-on technical skills.
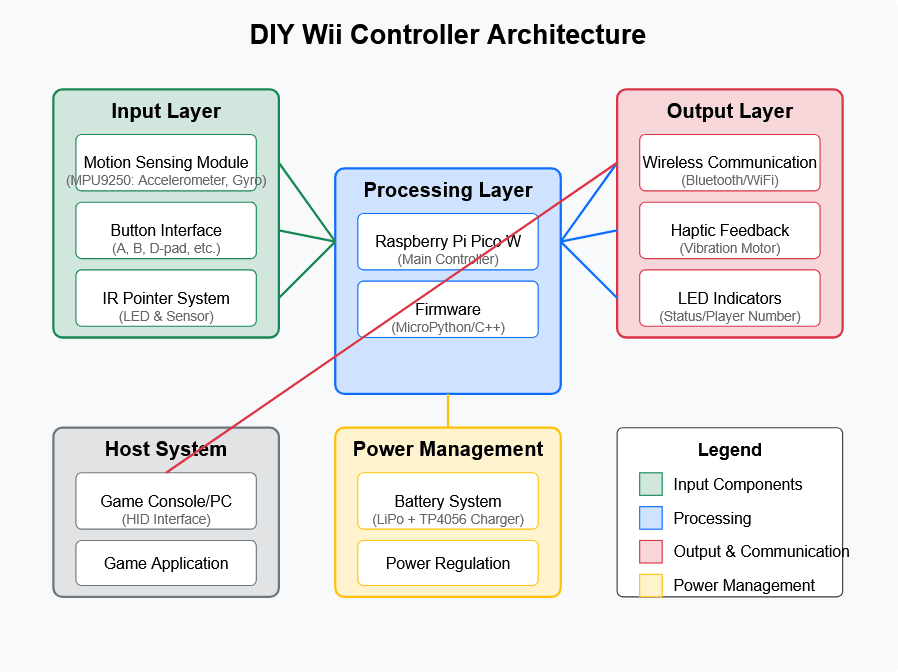
Architecture
Log
Week 5 - 11 May
Week 12 - 18 May
Week 19 - 25 May
Hardware
Raspberry Pi Pico W
Interface: Central MCU
Connections:
- Hosts all components via GPIO, I2C, and power lines
- Powered through USB or TP4056 module
Role: Core microcontroller running firmware, handling inputs, sensor data, and communication.
MPU9250 & BMP280 10DOF Module
Interface: I2C
Connections:
- SDA connected to Pico I2C pin (e.g., GP4)
- SCL connected to Pico I2C pin (e.g., GP5)
- VCC connected to 3.3V
- GND to Ground
Role: Handles motion sensing with accelerometer, gyroscope, magnetometer, and barometer data.
Buttons (A / B / Trigger)
Interface: GPIO
Connections:
- Each button connected to a dedicated GPIO pin with pull-down resistor
- One side of the button to GPIO, other to GND
Role: User input for control actions such as A, B, and trigger functionality.
TP4056 Micro USB LiPo Charger
Interface: Power
Connections:
- IN+ / IN– connected to USB power source
- BAT+ / BAT– connected to LiPo battery
- OUT+ provides power to the Pico (VBUS or via regulator)
Role: Charges LiPo battery and supplies regulated power to the system.
Power Supply (LiPo Battery)
Interface: Power
Connections:
- Connected to TP4056 module (BAT+ / BAT–)
Role: Provides portable power for untethered use.
Breadboard + Wires
Interface: Passive connections
Connections:
- Used for prototyping and connecting all components
Role: Temporary circuit assembly platform during development and testing.
Schematics
WIP...
Bill of Materials
| Device | Usage | Price |
|---|---|---|
| Raspberry Pi Pico W | The microcontroller | 35 RON |
| MPU9250 & BMP280 10DOF Module | Accelerometer, gyroscope, magnetometer for motion sensing | 55 RON |
| TP4056 Micro USB LiPo Battery Charger | Power management for portable use | 5 RON |
| Round White Buttons | Input controls (A/B/trigger/etc.) | 2 RON |
| Breadboard | Prototyping the circuit | 10 RON |
| Breadboard wire set | Connecting components on the breadboard | 8 RON |
| Header pins | Connecting components to the Raspberry Pi | 1 RON |
Software
| Library | Description | Usage |
|---|---|---|
| embassy-rs | Async/await runtime for embedded systems | Core framework for the project |
| embassy-rp | Embassy HAL for RP2040 | Hardware abstraction for Raspberry Pi Pico |
| mpu9250-driver | Driver for MPU9250 sensor | Interfacing with the accelerometer, gyroscope and magnetometer |
| btleplug | Bluetooth Low Energy library | Wireless communication interface |
| embassy-usb | USB stack for Embassy | For USB device emulation (when using as wired controller) |
| embassy-time | Time handling for Embassy | Managing timing and delays |
| serde | Serialization framework | For data formatting and communication protocols |
| embedded-hal | Hardware Abstraction Layer traits | Standard interface for hardware components |
| defmt | Debugging and logging | For development and debugging purposes |
| pid | PID controller | For smoothing motion data |