Electric Piano
An electric piano made using mainly buttons and the Raspberry Pico 2W
Author: Preda Vlad
GitHub Project Link: Github
Description
This project aims to create a functional electric piano using the Raspberry Pico's many GPIO ports. Alongside the standard function to play notes, I aim to implement several others, such as a metronome, the choice between 5 separate instruments, a delay feature, the option to offset the used octaves and a playback feature. The main shell of the project will essentially be a 3D printed hull whose keys will press down on buttons that activate a specific GPIO to play a specific note. On command, a signal will be sent which will play an audio file specific to the current settings through a speaker.
Motivation
For a few years now, I've been learning to play the piano, using an old keyboard that I received a long time ago. Aside from the pleasure of playing, I have been interested in recreating the specific functions that my keyboard has, but also really wished it had more. The delay and playback features are not present on the keyboard I play, yet I feel my creativity could have fun with these features. Therefore, I chose such a topic out of love for music, but a desire to not be held back by the functionality of what I currently own.
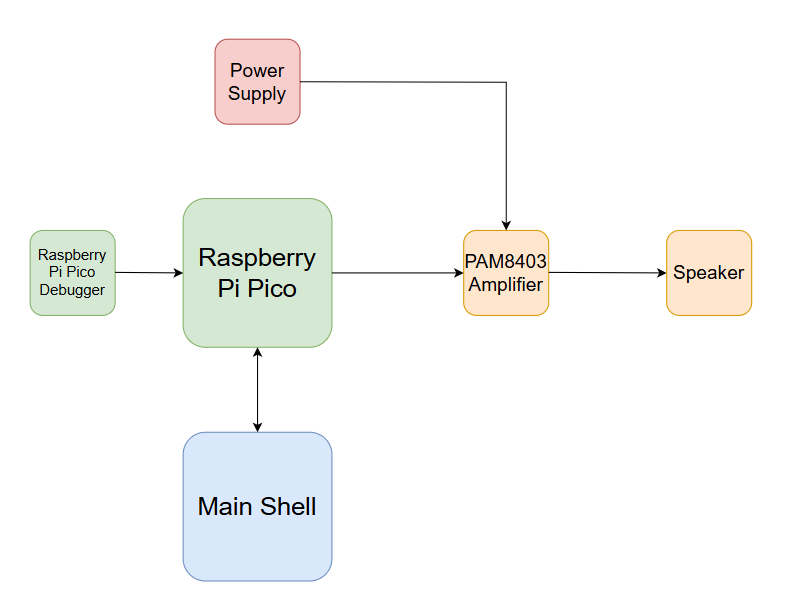
Architecture
Diagram
Components
The 2 Raspberry Pi Picos are used to control the entire project. One of them, on top of being used as a debugger, also lends its GPIO ports for the numerous buttons. For the note buttons, they cover 2 octaves + a note, and connect to GPIO pins from both Picos. The function buttons each cover a different purpose. There's a power supply which is needed to power a PAM8430 audio amplifier, which feeds into a speaker to play the sound of the note.
Log
Week 5 - 11 May
Week 12 - 18 May
Week 19 - 25 May
Hardware
- Raspberry Pico 2W: The brain of the project, it handles all the the input/output signals regarding keys and other features.
- Speaker: Used in order to play the sound files, hooked up to an amplifier.
- Potentiometer: Used to change volume.
- Buttons: Used for keys, as well as supplementary features.
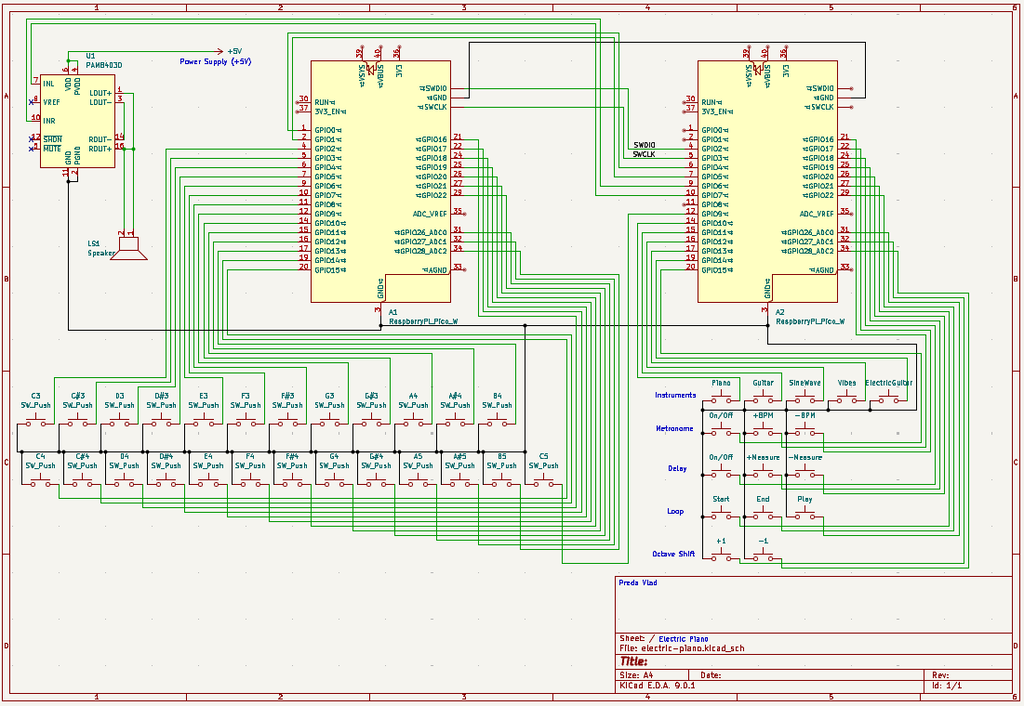
Schematics
Bill of Materials
| Device | Usage | Price |
|---|---|---|
| Raspberry Pi Pico 2W | The microcontroller | 39.66 RON |
| Header pins | Pins for the microcontroller + other modules | 2 RON |
| Amplifier module PAM8403 | Module for the speaker | 4 RON |
| 3x Breadboard | Breadboards for picos and other components | 30 RON |
| 10k WH148 Potentiometer | Controlling volume | 2.39 RON |
| Cap for potentiometer | Covers the potentiometer | 1 RON |
| Micro USB cable | Connecting to the microcontroller | 4 RON |
| 40x Button | Keys + other functions | |
| 10cm Male-to-Male jumper wires | Connections between components | 5 RON |
| 10cm Male-to-Female jumper wires | Connections between debug and main pico | 3 RON |
Software
| Library | Description | Usage |
|---|---|---|
| embassy-rp | The HAL implements both blocking and async APIs for many peripherals. | |
| defmt | Adds several debugging features | Logging/Debugging along the way |
| cortex-m-rt | Contains all the required parts to build a no_std application | |
| embassy-time | Time management library | Used for time-based operations such as delays |